I will always love you(English Translation)


You are welcome to take this  arrow with you, it shows you always where you are
(just click and drag)

This tutorial was written, designed and its

© Copyright is of Passion.graphic and this translation is  © Copyright of Passion. graphic too

Translator

This tutorial is regularly registered 

The tutorial cannot be copied nor downloaded in other sites or blog without my permission and my  link


If I unknowingly violated some copyright please send me mail


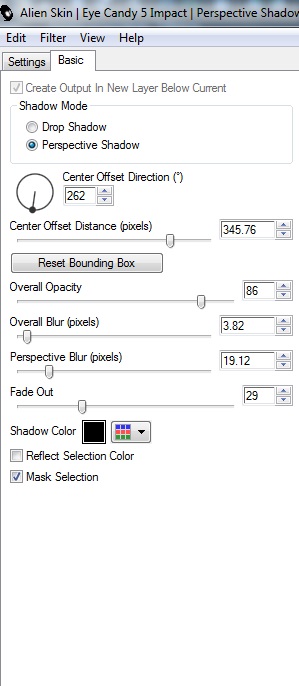
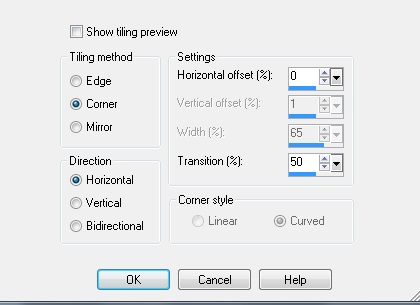
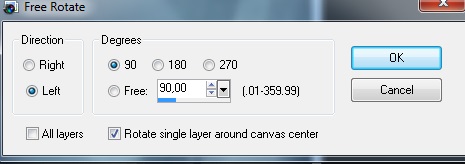
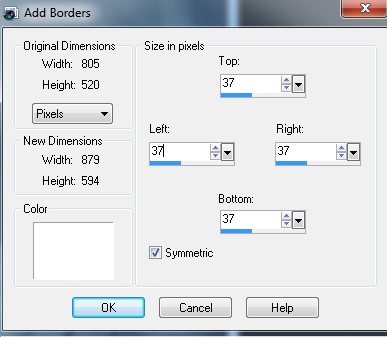
This tutorial was done with PSP X 2, but it can be done with other versions of PSP

Material


Filters/Plugins


Eye Candy 5


Mehdi

Simple

VM Natural


HERE

Thanks to the creators of the tube, because without them we couldn't do graphics


Respects the work of creators and do not delete the copyright level


I would say to  the Group of share Fantasiadicolori thanks
for wonderful tubes 


Tube

Hazal


Syl


Ok let's start
 
File / New / 805 x 520 pixels/ transparent 

Set your foreground to 
#020711

and your background to 
#86cbc5


Effects>Mehdi>Wavy Lab


 Effects>VM Natural>Downstairs


Image>Resize 80%


Effects>3D effects>drop shadow
-3/2/59/8,91
colour black


Layers>Duplicate

Image>Free rotate


change blend mode dodge

Layers>Duplicate

Effects>Image effects>offset
231/0


Layers>Duplicate

Image>Mirror

Image>Flip

change blend mode dodge


Layers>merge>merge visible


Image>Resize 73%


Effects>Eye Candy 5>Impact


Image>Flip


Effects>Eye Candy 5 Impact>Perspective Shadow


Layers>New raster layer

flood fill  the layer with  gradient
Style Linear
Angle 110
Repetitions 0


Layers>arrange>send to bottom

Active first layer 

Effects>image effects>seamless tiling


Layers>merge>merge visible


Image>Resize 73%


Effects>Eye candy 5 Impact>Perspective Shadow


Image>Flip

Effects>Eye candy 5>Impact


Layers>New raster layer

flood fill  the layer with  gradient
Style Linear
Angle 110
Repetitions 0


Layers>arrange>send to bottom

Layers>merge>merge visible

Layers>Duplicate

Image>Free rotate


change blend mode screen

Layers>merge>Merge visible

Image>Resize 83%


Effects>Eye candy 5 Impact>Perspective Shadow


Image>Flip


Effects>Eye candy 5 Impact>Perspective Shadow


Layers>New raster layer

flood fill  the layer with
 gradient
Style Linear
Angle 110
Repetitions 0


Layers>arrange>send to bottom


Image>add borders


Active magic wand and select white border


Effects> 3D effects>buttonize

68/99/37
colour black


Selections>selection none


Layers>New raster layer


Selection>Load/save selection>Load selection from disk 


Flood fill with colour #ffffff


Opacity 23

Selections>Selection none

Layers>Duplicate

Effects>image effects>offset
231/0


Layers>New raster layer


Selections>Load/save selection>Load selection from disk


Selections>Modify>Select Selection borders


Flood fill selection with colour #ffffff


Effects> 3D effects>buttonize
68/99/37
colour black


Effects> 3D effects>drop shadow
-3/2/59/8,91
colour black


Selections>selection none


Open tube SvB Decoratie 11.psd

edit>Copy

back to your picture

edit>paste as new layer


Image>Resize 50%


Effects >image effects>offset
-96/100


Activate eraser tool and erase the parts of the tube above the frame of the picture


Open tube SvB Decoratie 11

edit>Copy

back to your picture

edit>paste as new layer


Image>Resize 50%


Effects>image effects>offset
0/-30


Activate eraser tool and erase the bits you over the picture


Layers>New raster layer


Selections>Load/save selection >Load selection from disk


Fill flood selection with #ffffff


Opacity 23

Selections>Selection none

Layers>Duplicate

Effects>Image effect>Offset
231/0


Open tube lamptubes13HaZaL

edit>Copy

back to your picture

edit>paste as new layer


Image>Free rotate


Activate eraser tool and erase the parts of the tube more

Image>Resize 70%


Effects>Image effects>offset
-438/110


Effects>Image effects>offset
34/0

Effects>Image effects>offset
-20/0


Effects> 3D effects>drop shadow
-3/2/59/8,91
colour black


Open wordartIwillalwaysloveyoupassiongraphic

edit>Copy

back to your picture

edit>paste as new layer


Effects>Image effects>offset
101/0

change blend mode overlay

Opacity 77

Layers>merge>merge visible


Image>Resize 80%


Layers>New raster layer

Flood fill layer with colour #020711

Layers>arrange>send to bottom

activate first layer


Open tube woman tubes 149-HaZaL

edit>Copy

back to your picture

edit>paste as new layer

Modifica>Copia


Image>Resize 80%


Effects>Image effects>offset
315/-57


Effects> 3D effects>drop shadow
-3/2/59/8,91
colour black


Image>add borders


Put your watermark


Save Jpg


I hope you enjoyed doing this tutorial 

Home


10 Novembre  2013


Webmaster Passion.graphic